
Nanoimprint Lithography of Microneedle Arrays
The use of various types of Microneedles (solid, coated, dissolving, hollow) is being investigated for the transdermal administration of drugs or vaccines. They are typically less than 1 mm long and painlessly breach the outer skin layer for subcutaneous delivery of drugs and vaccines, making microneedles an alternative to injection therefore allowing self-administration. There are various ways to produce such microneedle arrays from different materials. GeSiM would like to share a procedure for the production of solid microneedles for research purposes that employs a PDMS mold and photocurable materials aided by application of a vacuum. Depending on the material chosen these could either be dissolving or coated. Coating would also be possible with the same instrument immediately after molding.


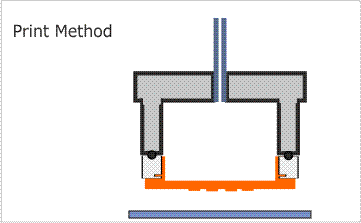


The instrument used is an improved GeSiM Micro-Contact Printer µCP 4.1 with a special vacuum adapter for the stamp head. The µCP 4.1 enables fully automatic, programmable and highly repeatable Micro-Contact Printing (µCP), Surface Patterning and Nanoimprint Lithography (NIL) on the same instrument. It employs several PDMS stamps which can be cast with little effort and cost from a silicon master using the kit included with the µCP 4.1. The unique stamp-head allows movement in x-y-z and one rotational axis and includes a UV-lamp for photo curing and a camera microscope for monitoring. It utilizes air pressure to dilate the PDMS membrane to make contact with the substrate. This allows for superb control of the molding and de-molding process.
The stamp is mounted on the head together with a gasket-ring adapter. Together they form a seal with the substrate and allow for evacuation of air from the chamber they create. This minimizes the air trapped inside the mold and allows the resin to flow into the fine features of the mold.
A defined volume of resin is dispensed from the µCPs’ heated dispenser onto the substrate (here a wafer). This substrate can also be heated to maintain a lower viscosity of the resin.
With the resin in place the stamp is moved into position, vacuum is drawn from the chamber as air pressure is applied to the PDMS membrane to make contact with the resin and the substrate. The camera microscope inside the stamp-head allows the operator to check for trapped air looking at the magnified view of the stamp area on screen. If air has been trapped the molding process can be re-executed until acceptable results are achieved.
Then the UV-exposure is initiated. After the UV-Exposure is complete the de-molding protocol gently removes the stamp.
The µCP allows for creation of protocols for movements of the stamp head, control of the vacuum, air pressure and UV-exposure as well as the delicate de-molding process. Once parameters have been optimized this allows for consistent repetition of the process.
The Micro-Needle Array can now be inspected and, if applicable, coated on the µCP with picoliter volumes of active compound solution using the optional Piezo-Pipette.
To illustrate this process a 5x5 array of microneedles with a base radius of 200 µm and a height of 1200 µm was cast using NOA-63 (a photocurable resin) at the GeSiM research lab by a GeSiM Application Engineer. A protocol is given below.
Protocol:
1. Mount the stamp to the vacuum ring, forming the vacuum-stamp
2. Mount the vacuum-stamp on the print head
3. Dispense UV-curable adhesive NOA-63 onto substrate
4. Move the vacuum-stamp to contact level, applying membrane pressure to a slight holding vacuum (p = - 6 kPa) resulting in concave stamp membrane
5. Evacuate the chamber formed by the attached vacuum ring and the substrate,
6. While vacuum is applied, set the membrane pressure to p = 15 kPa, to create contact between stamp membrane and substrate
7. Maintain vacuum and contact level for 3…5 min to allow NOA-63 to flow into the stamp cavities. (Hold-time depends on pattern design, and viscosity of resin)
8. Maintain vacuum during UV exposure time of 20 s
9. Switch off the membrane pressure and vent the vacuum chamber
10. Initiate de-molding by slowly driving to the home position
Results:
Picture top: raised needles on the master - fabricated by 2-photon-lithography, Picture middle: replica of the 2-photon-lithography master in soft PDMS (Sylgard 184, Dow Chemicals Europe GmbH)
Picture bottom: 5x5 needle array made by UV-NIL and the vacuum stamp. The needles are made of UV active resist NOA-63 (NorlandProducts Ltd.)